
Manual processing & email notifications
Summary
In rare cases, the ReBound-Shopify integration may be unable to process a refund automatically.
When this occurs, a notification will be sent to your designated email address, and manual processing of the return will be required within your Shopify store.
This page explains when manual intervention is needed, how to configure notification recipients, and the steps for manually processing returns.
When is manual processing needed?
Most refunds are processed automatically based on your configured refund milestone.
Manual processing is only required in rare cases, such as:
- Unsupported payment methods: Refunds cannot be issued automatically for orders paid by cash, gift card, or other unsupported payment methods in Shopify.
- Orders with multiple transactions: If the original order was paid using multiple transactions (e.g., split payments), the integration cannot determine the correct refund allocation and will require manual intervention.
- Technical or API failures: If there is a technical issue or failure in the integration or Shopify API at the time of refund processing, manual action will be needed.
- Other rare exceptions: Any other scenario where the integration cannot confidently process the refund (e.g., missing or inconsistent order data, configuration issues).
How will I be notified?
If manual action is required, the ReBound integration will automatically send an email notification to your designated contact. The email includes:
- The order reference number (Shopify order name).
- The items which require manual processing (receipt confirmation and refund or exchange release): product name, product SKU, return reason, expected outcome (refund to original payment method, store credit refund or exchange).
- A summary of the suggested actions, e.g. total suggested refund or number of exchange items to release.
- A link to the order in your Shopify admin.
How to set it up?
It is very important that you configure a valid email address for refund exception notifications in the Shopify app settings. This email should be actively monitored by your team.
We recommend using a shared mailbox or distribution list where all recipients have access to your Shopify stores and are authorized to manually process refunds. This ensures that any manual action required can be handled promptly, minimizing delays for your customers.
Configuration steps
-
Ensure the "ReBound Returns" app is installed and active in your Shopify store.
-
Open the app from the "Apps" section on the left sidebar (if pinned), or find it using the search bar at the top of the page.
-
Open the "Integration Settings" page and scroll down to the "Advanced order sync settings".
-
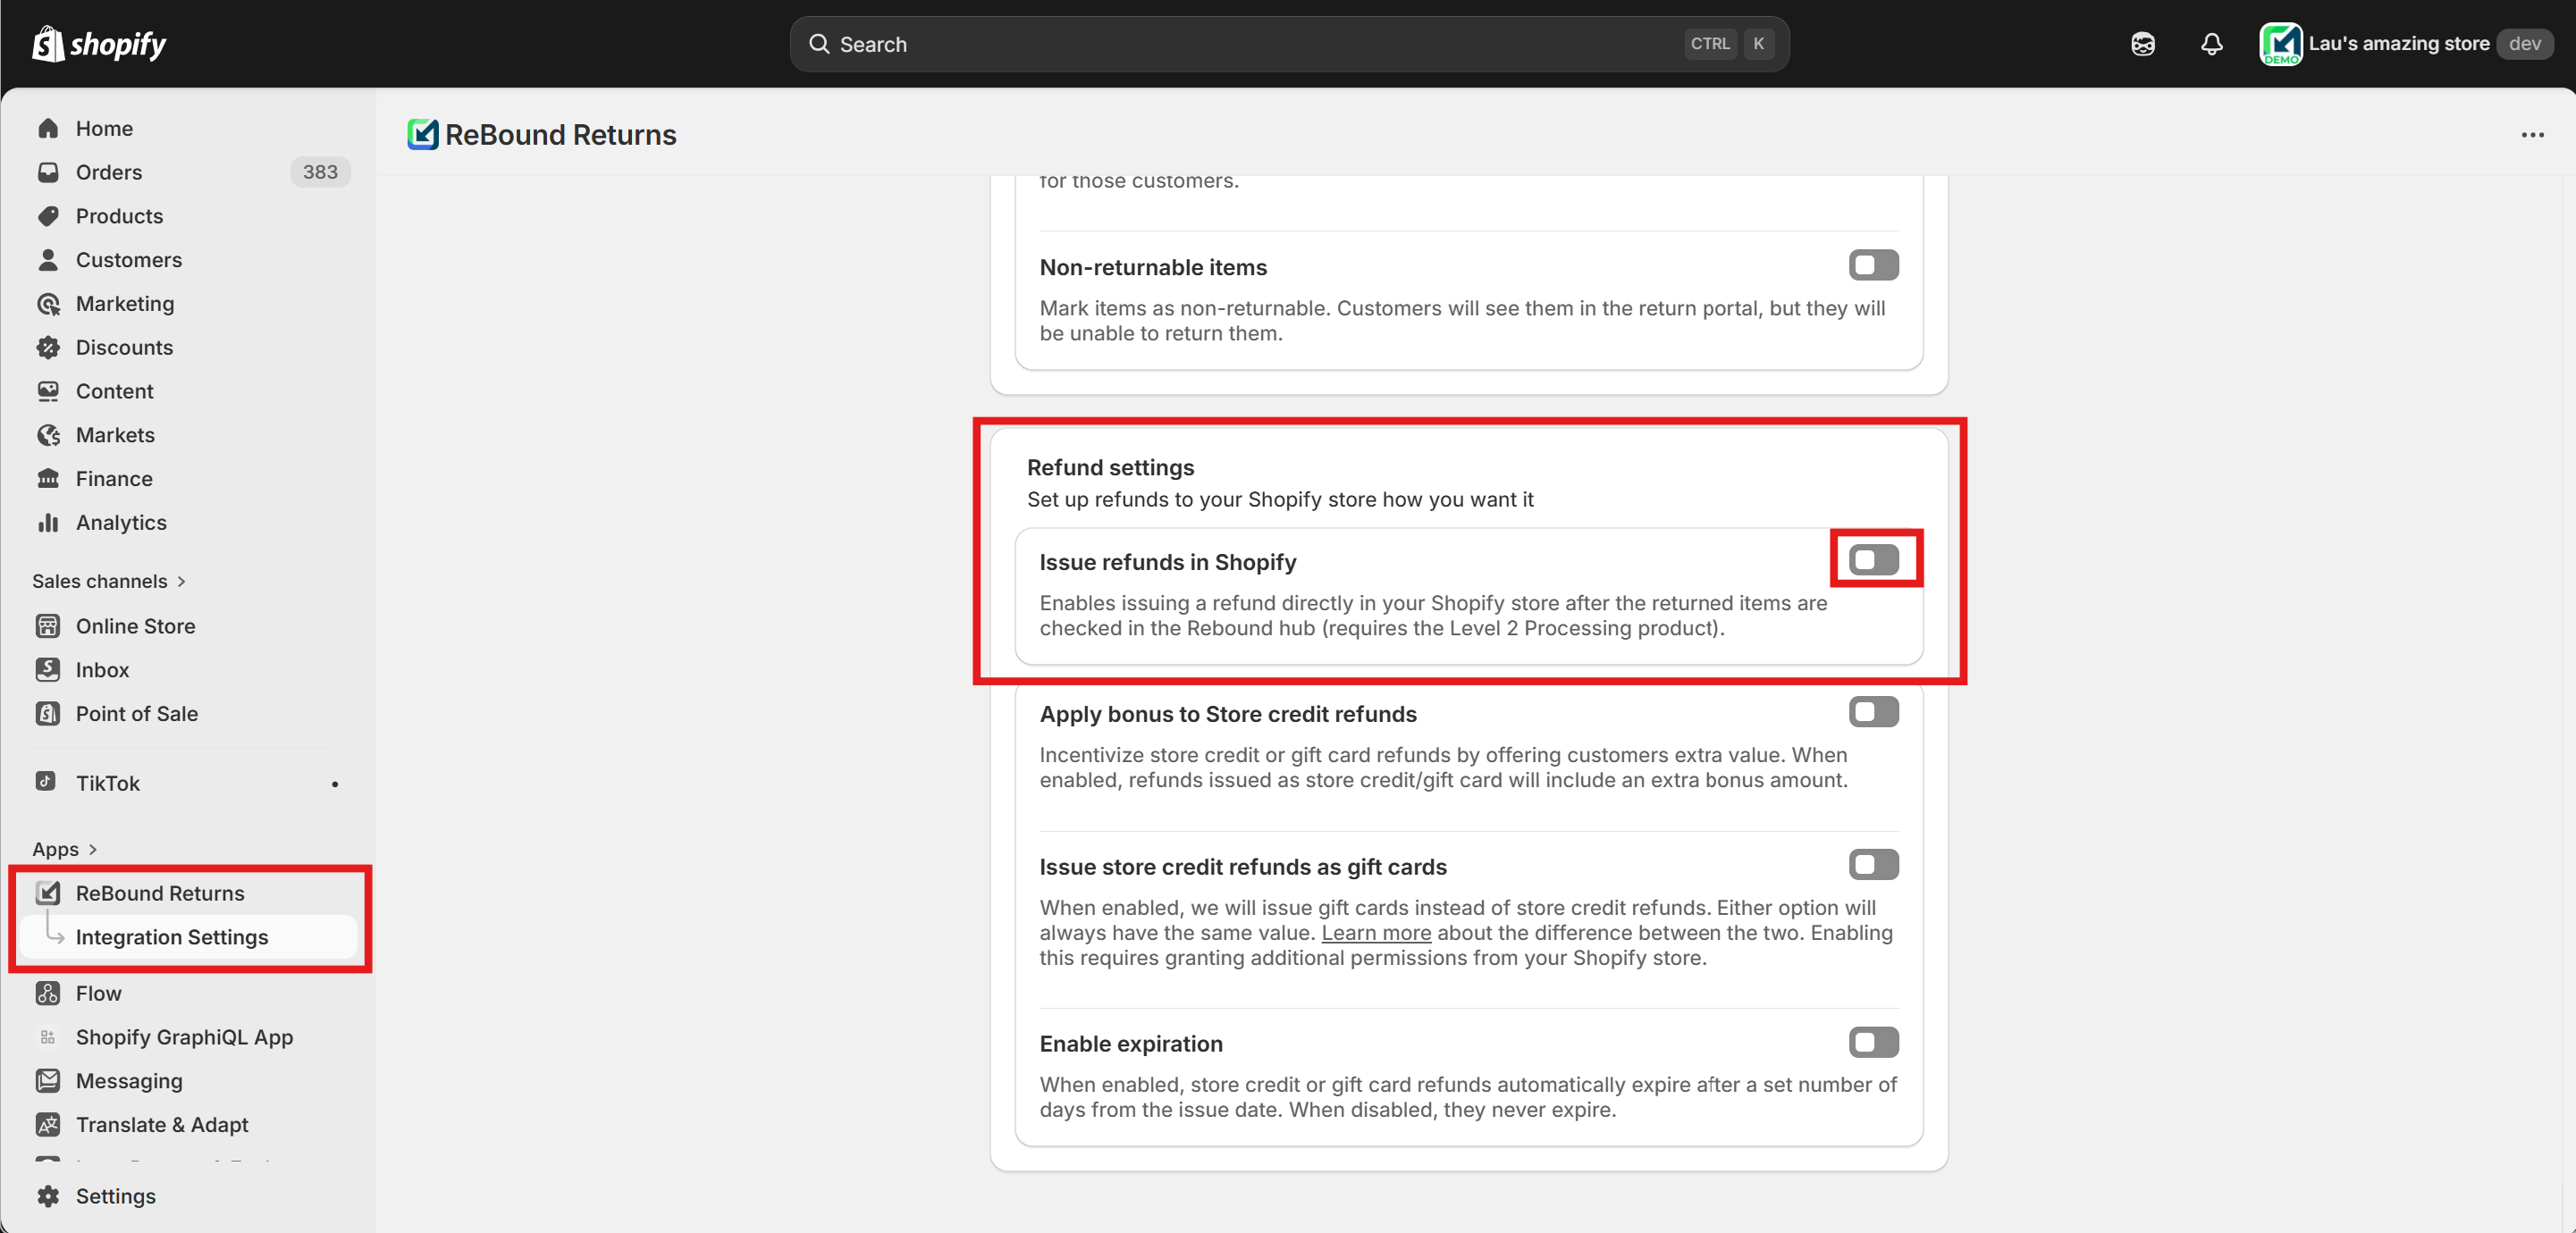
Find the "Refund settings" section.
-
Enable the "Issue refunds in Shopify" feature by clicking the toggle on its right. This will show a new field that allows configuring the email address.
-
Fill in your designated email address for refund exception notifications and press "Save".
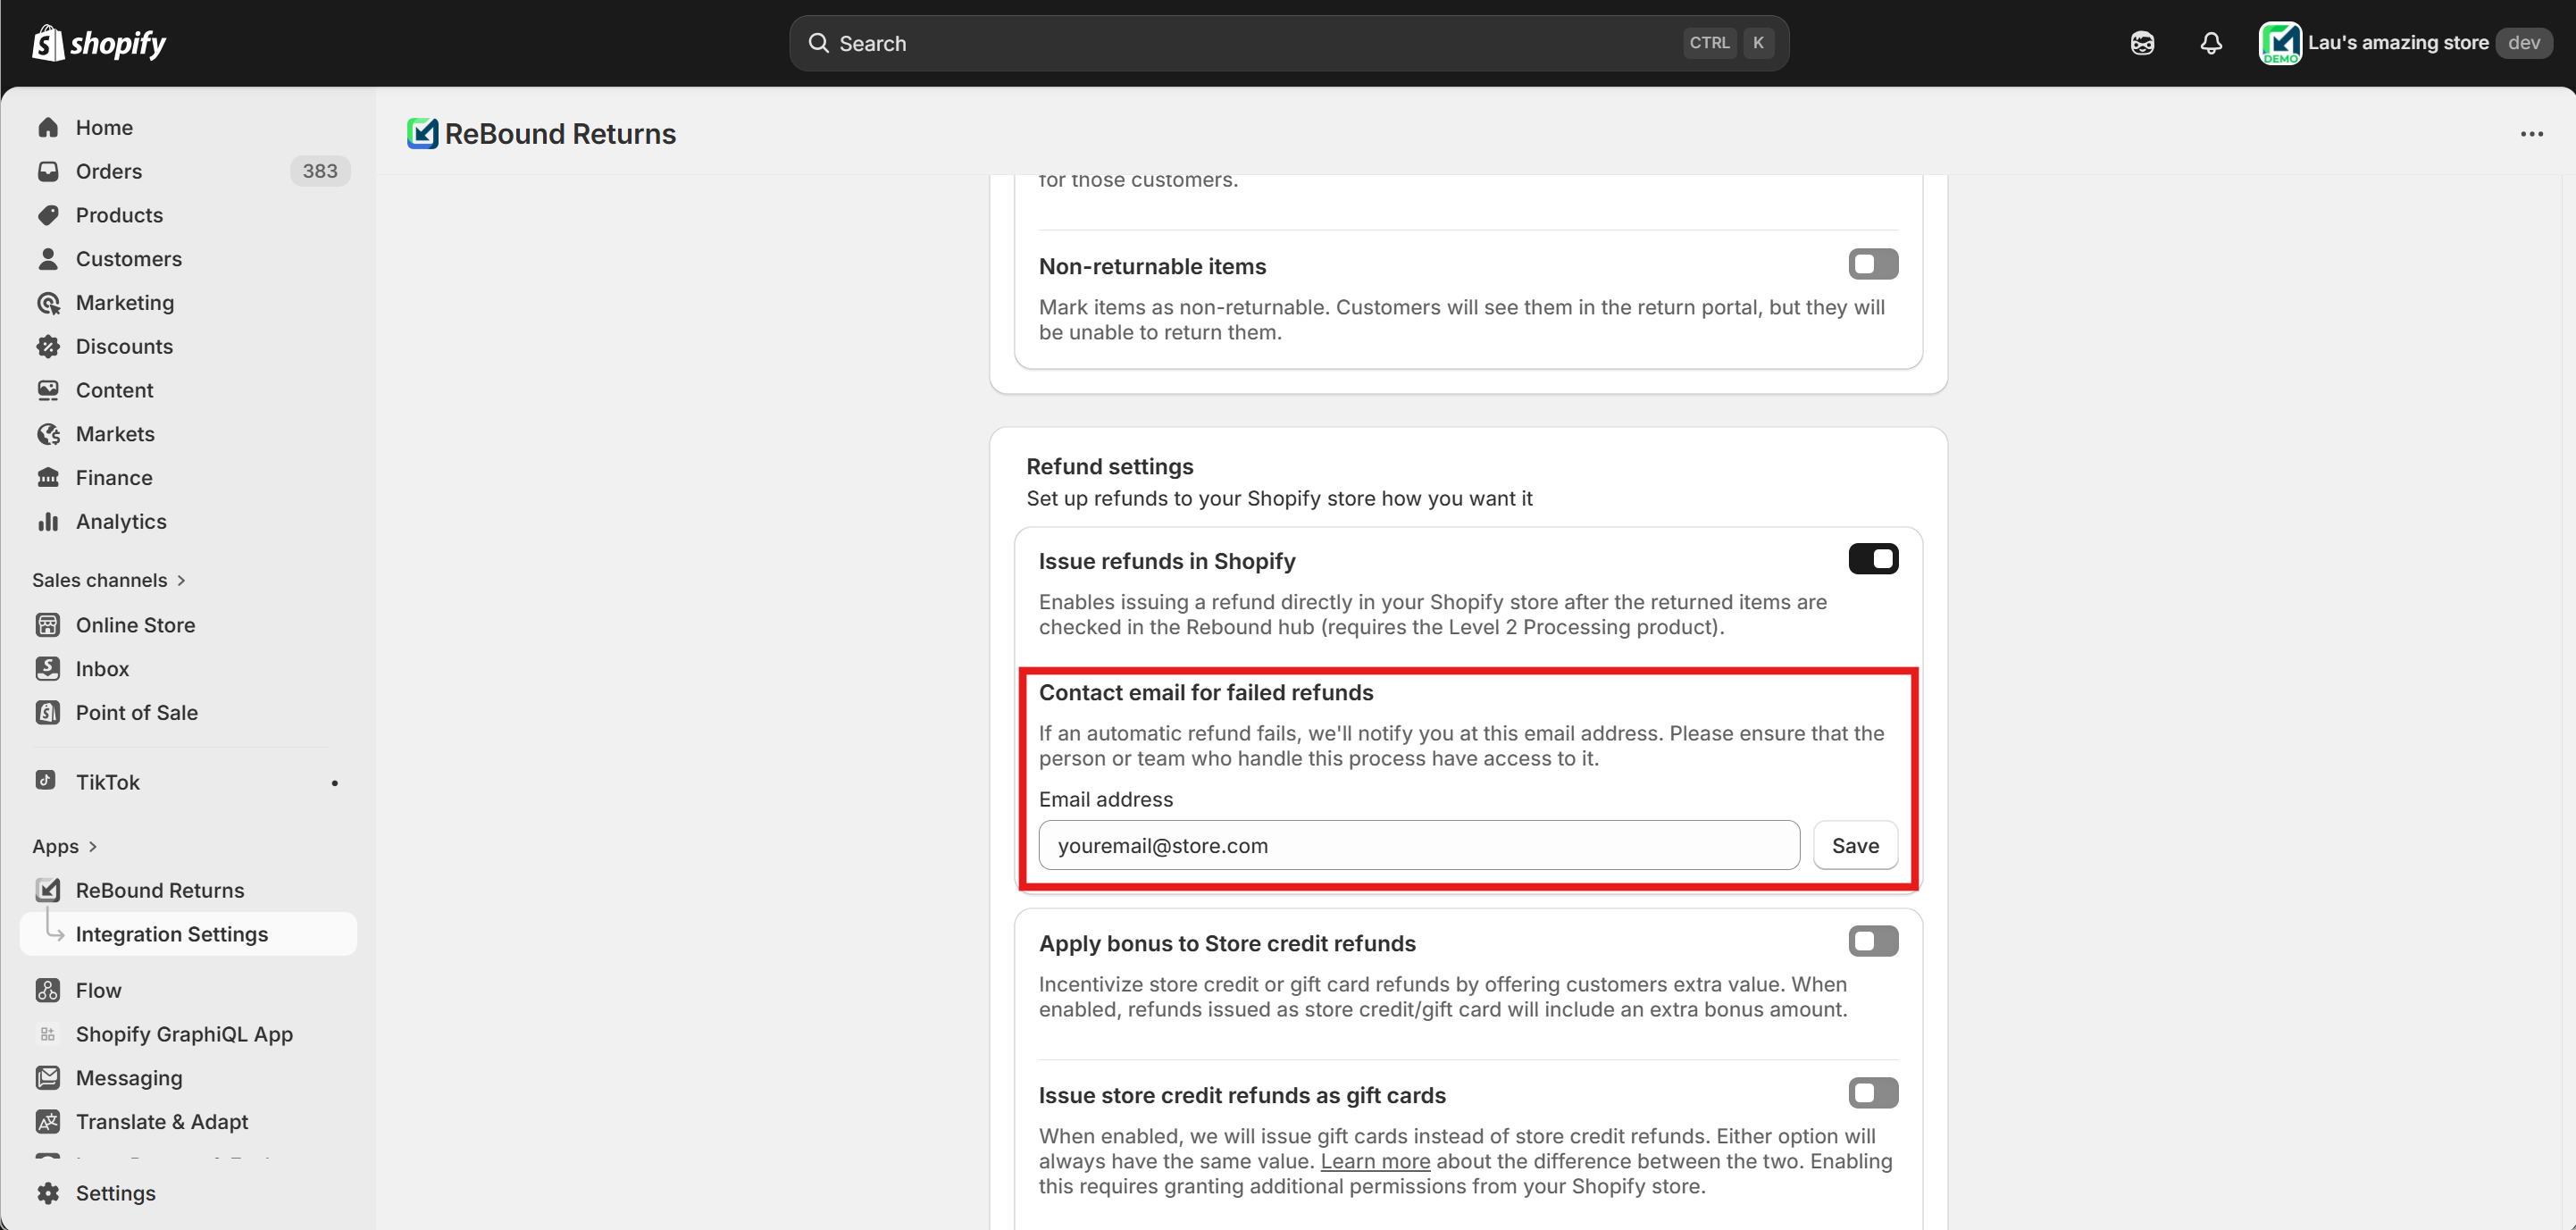
If you need to update the notification email address or recipients in the future, simply navigate back to this page (repeat the steps above), change the email address and press on "Update".
What should I do when I receive a notification?
-
Review the email: Read the details to understand why manual processing is needed.
-
Navigate to the Shopify order: Use the order reference in the email or the "Go to Shopify order" button to find and navigate to your Shopify order page.
-
Process the return manually: Find the open return (marked with a blue "Return in progress" tag in Shopify) and press the "Process and refund" button.
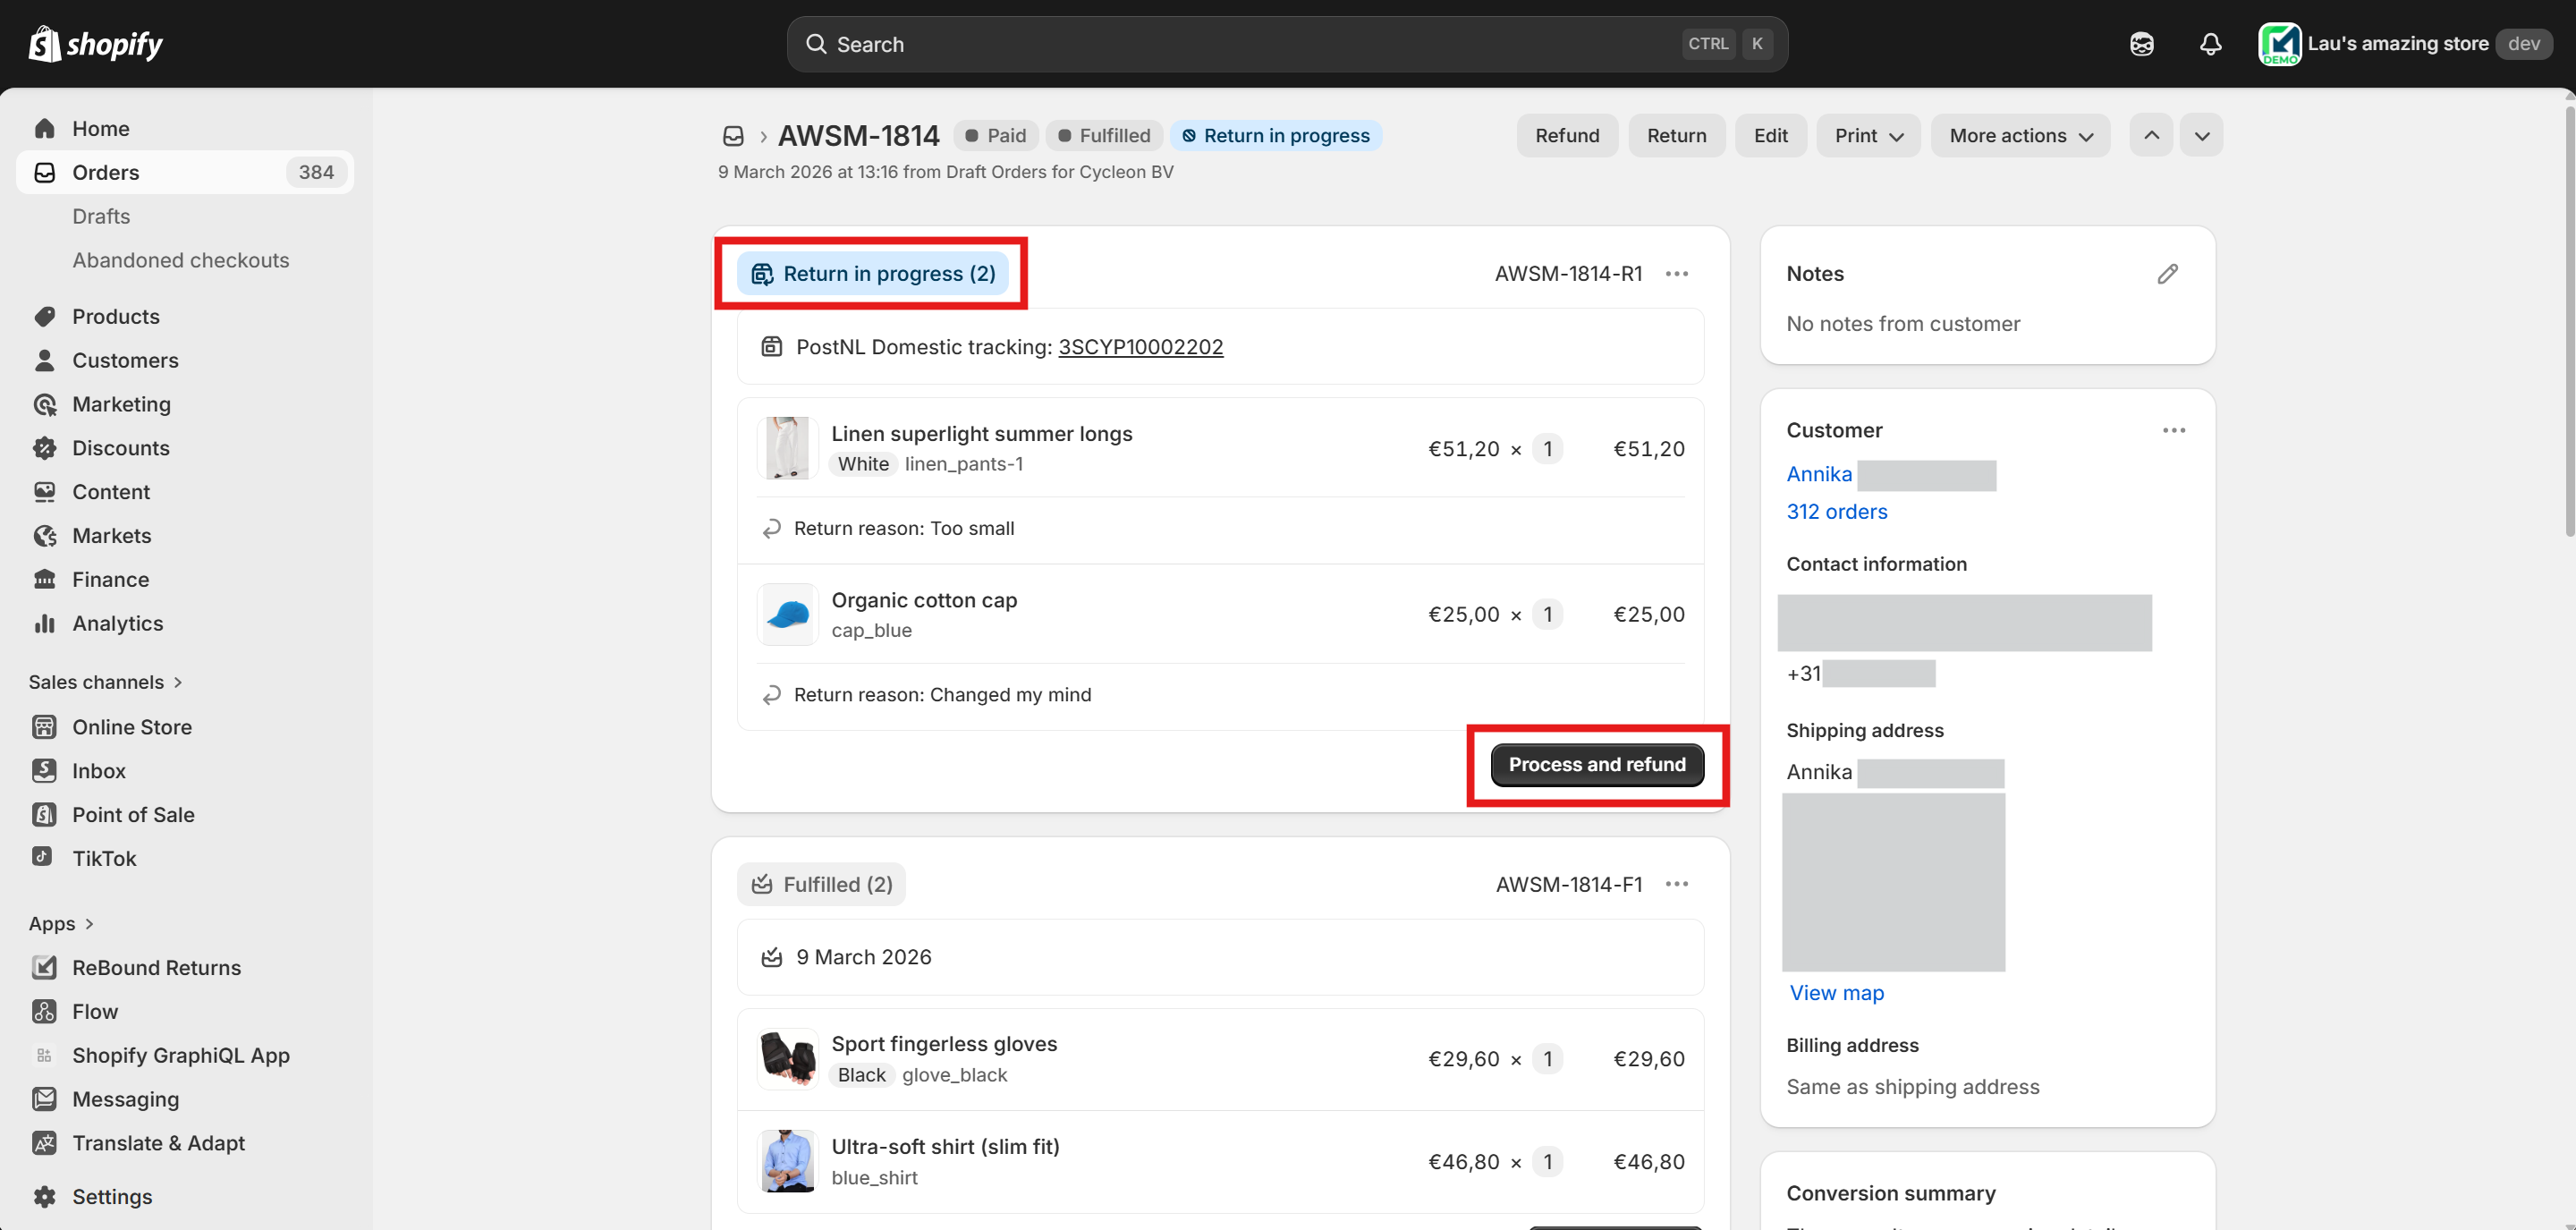
-
A page to process the return will open. On this page, you can process the return. Below you can find instructions for each outcome (refund, store credit or exchange). The "outcome" column in the email indicates how each item should be processed, based on the customer's request in the ReBound consumer portal.
Processing a refund to the original payment method
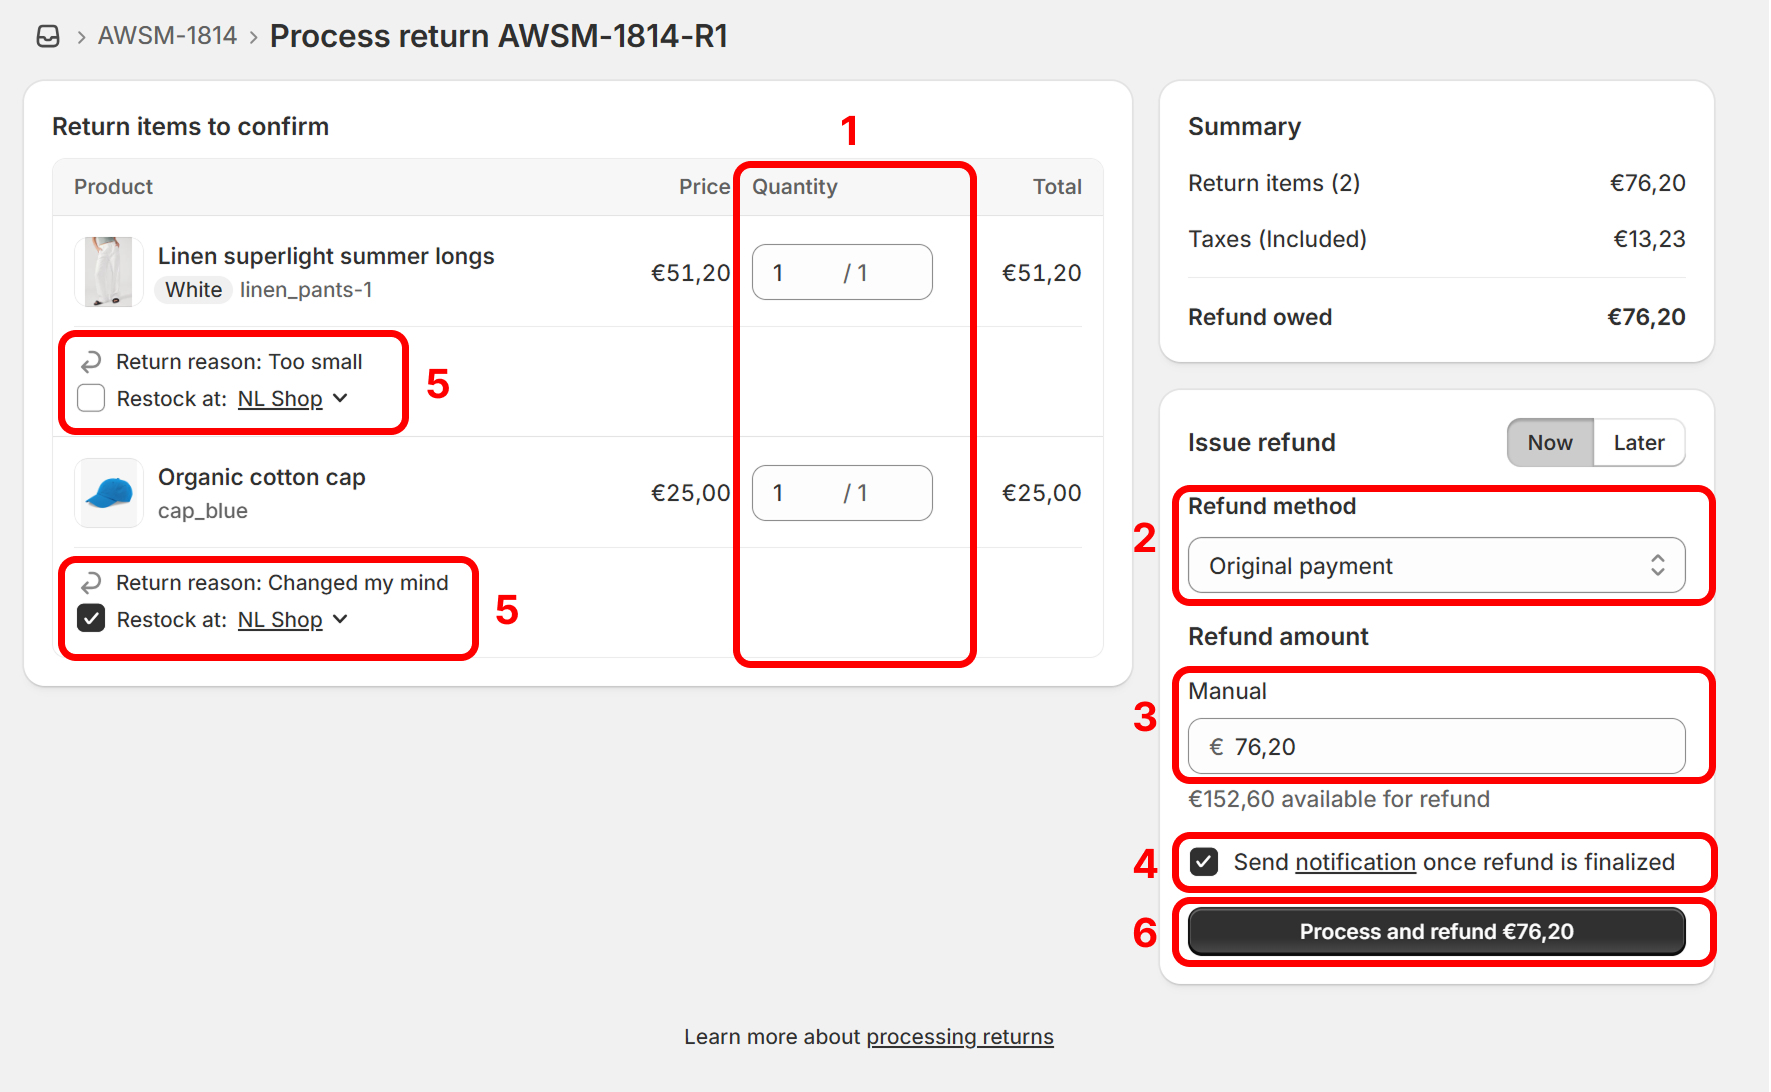
This applies to items with the "Refund" outcome. To process them on the "Process return" page:
- Mark which items you want to process. (We recommend processing the items in the notification email).
- Select the "original payment" Refund method.
- Indicate the refund amount (for all the selected items). This should be the total amount the customer paid for these items. Find it in the "Total suggested refund" from the email.
- We recommend checking the "Send notification" box, so that your customer receives an automatic email notification when the refund is processed by Shopify or the payment provider.
- Optionally, mark if you wish to restock these items. (We recommend not restocking them, as the return milestone that triggered this email usually happens before the items reach your hub; therefore, they are likely not yet back in stock).
- Press on "Process and refund" to confirm.
Processing a store credit refund
This applies to items with the "Store credit refund" outcome. To process them on the "Process return" page:
- Mark which items you want to process. (We recommend processing the items in the notification email).
- Select the "Store credit" Refund method.
- Indicate the refund amount (for all the selected items). This should be the total amount the customer paid for these items. Find it in the "Total suggested store credit refund" from the email.
- Any bonus offered to store credit refunds to incentivize this outcome can be issued separately (see below).
- Optionally, press the calendar button to add an expiration date to the store credit.
- We recommend checking the "Send notification" box, so that your customer receives an automatic email notification when the refund is processed by Shopify or the payment provider.
- Optionally, mark if you wish to restock these items. (We recommend not restocking them, as the return milestone that triggered this email usually happens before the items reach your hub; therefore, they are likely not yet back in stock).
- Press on "Process and refund" to confirm.

Issuing the bonus store credit refund
If you are currently incentivizing customers to choose a store credit refund, you'll also have to issue the bonus part of the refund.
For example, if a customer returns $100 worth of items and you're offering a 7% bonus, a bonus of $7 must be issued in addition to the $100 store credit refund.
To issue the bonus store credit refund, follow these steps:
-
Press on the customer's name on the order page. This will take you to that customer's profile.
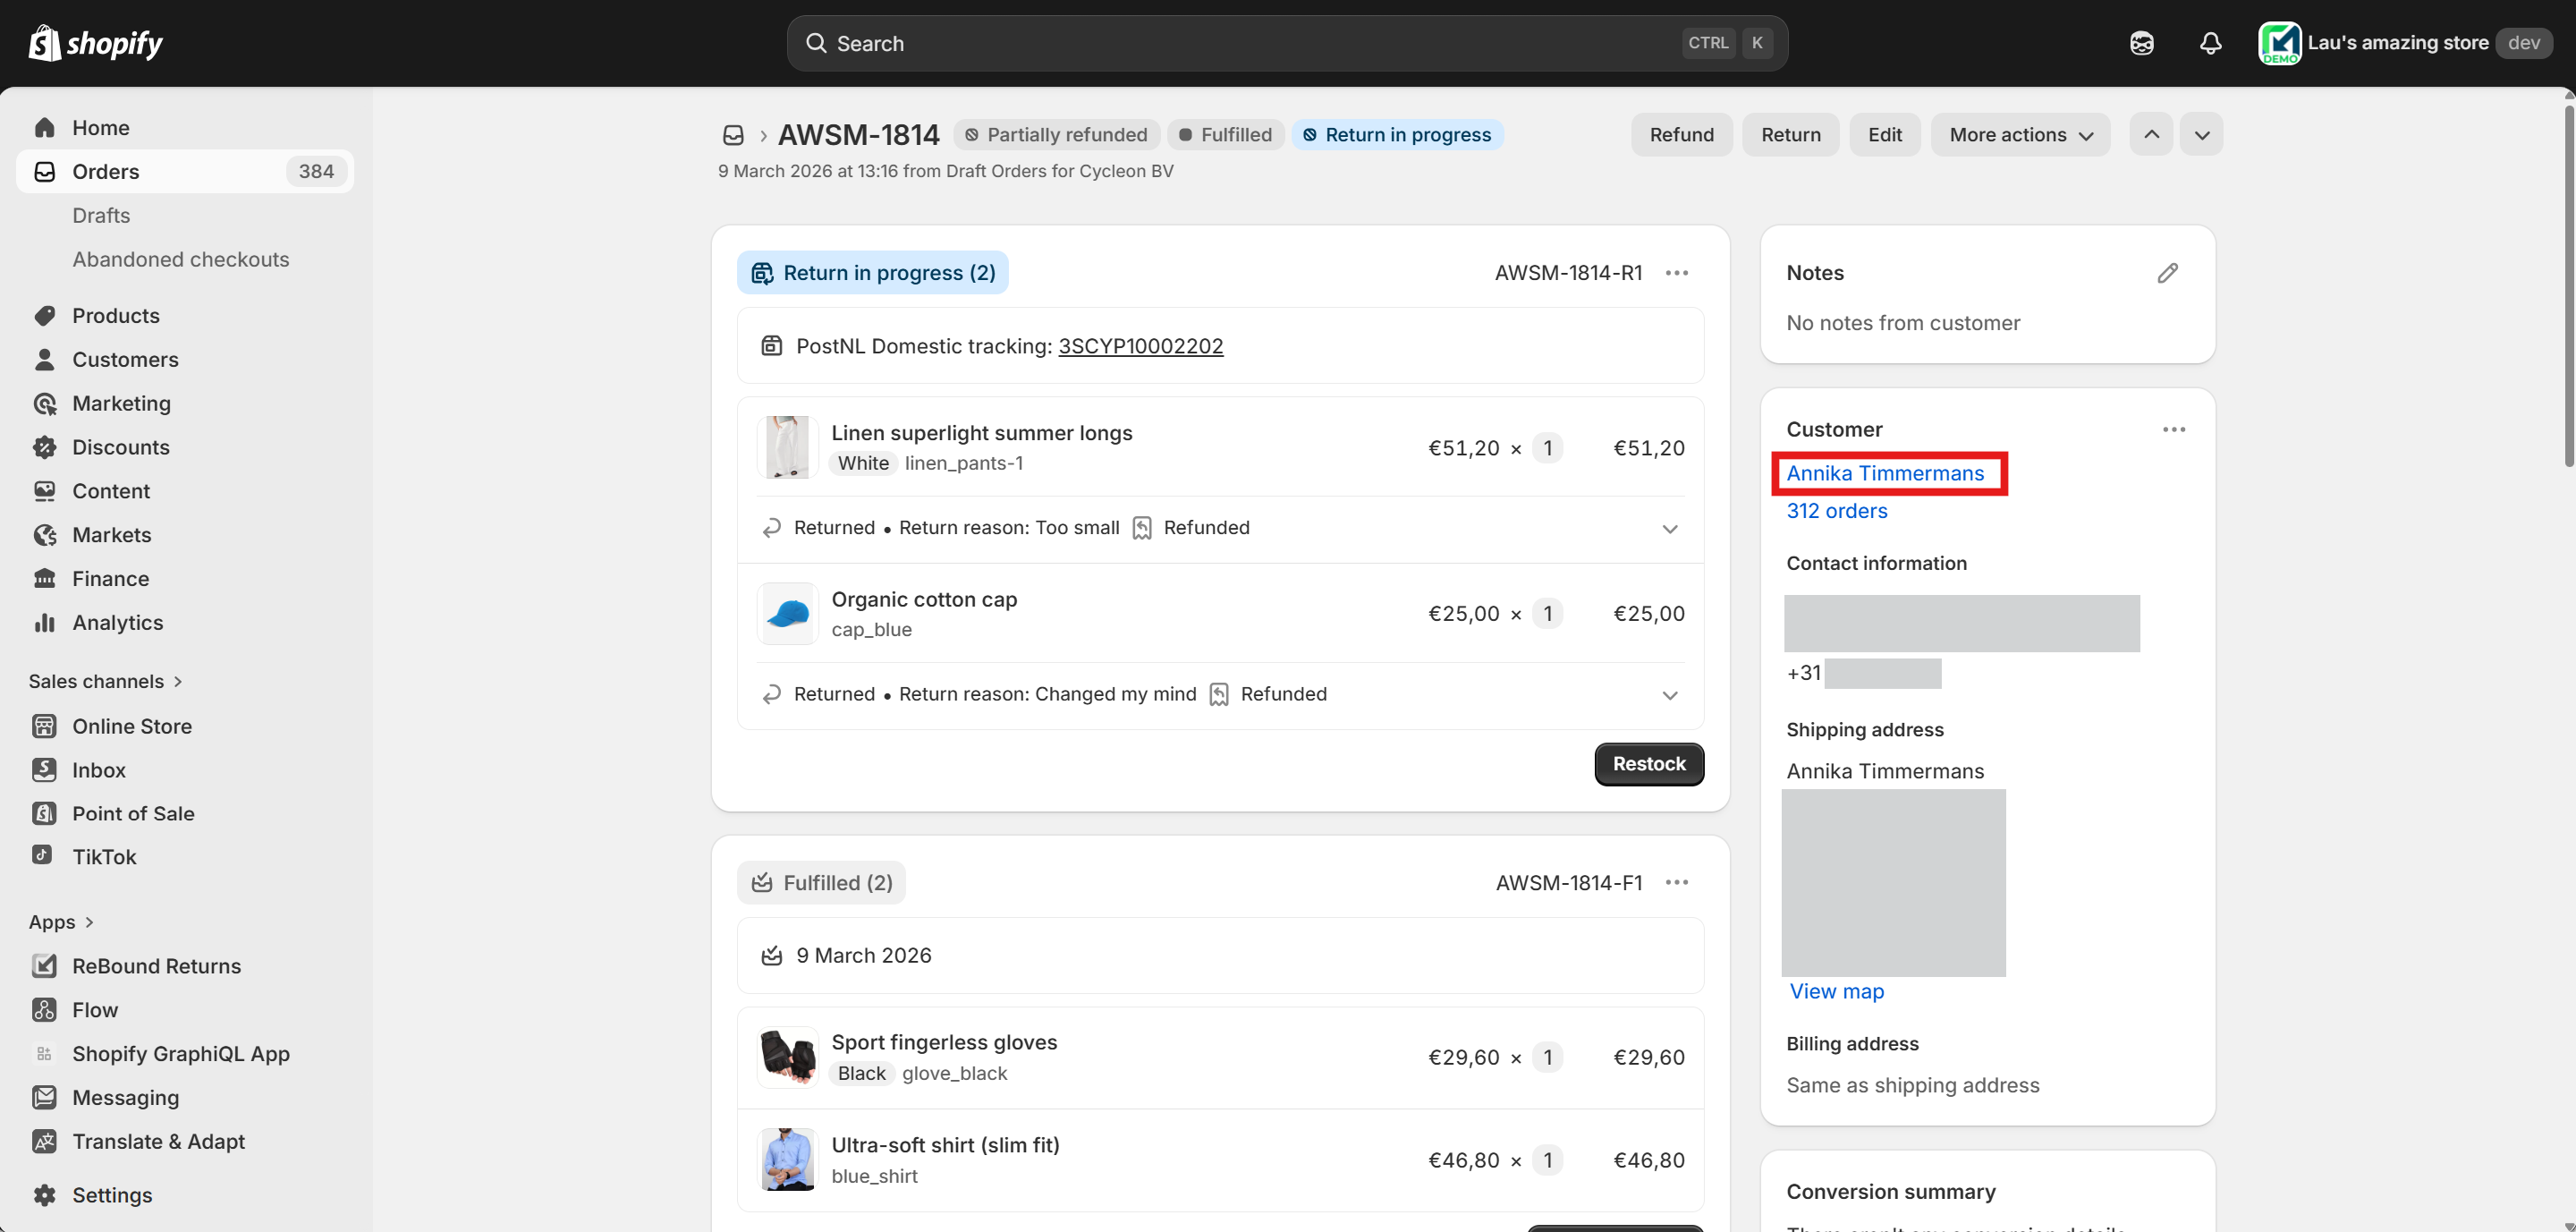
-
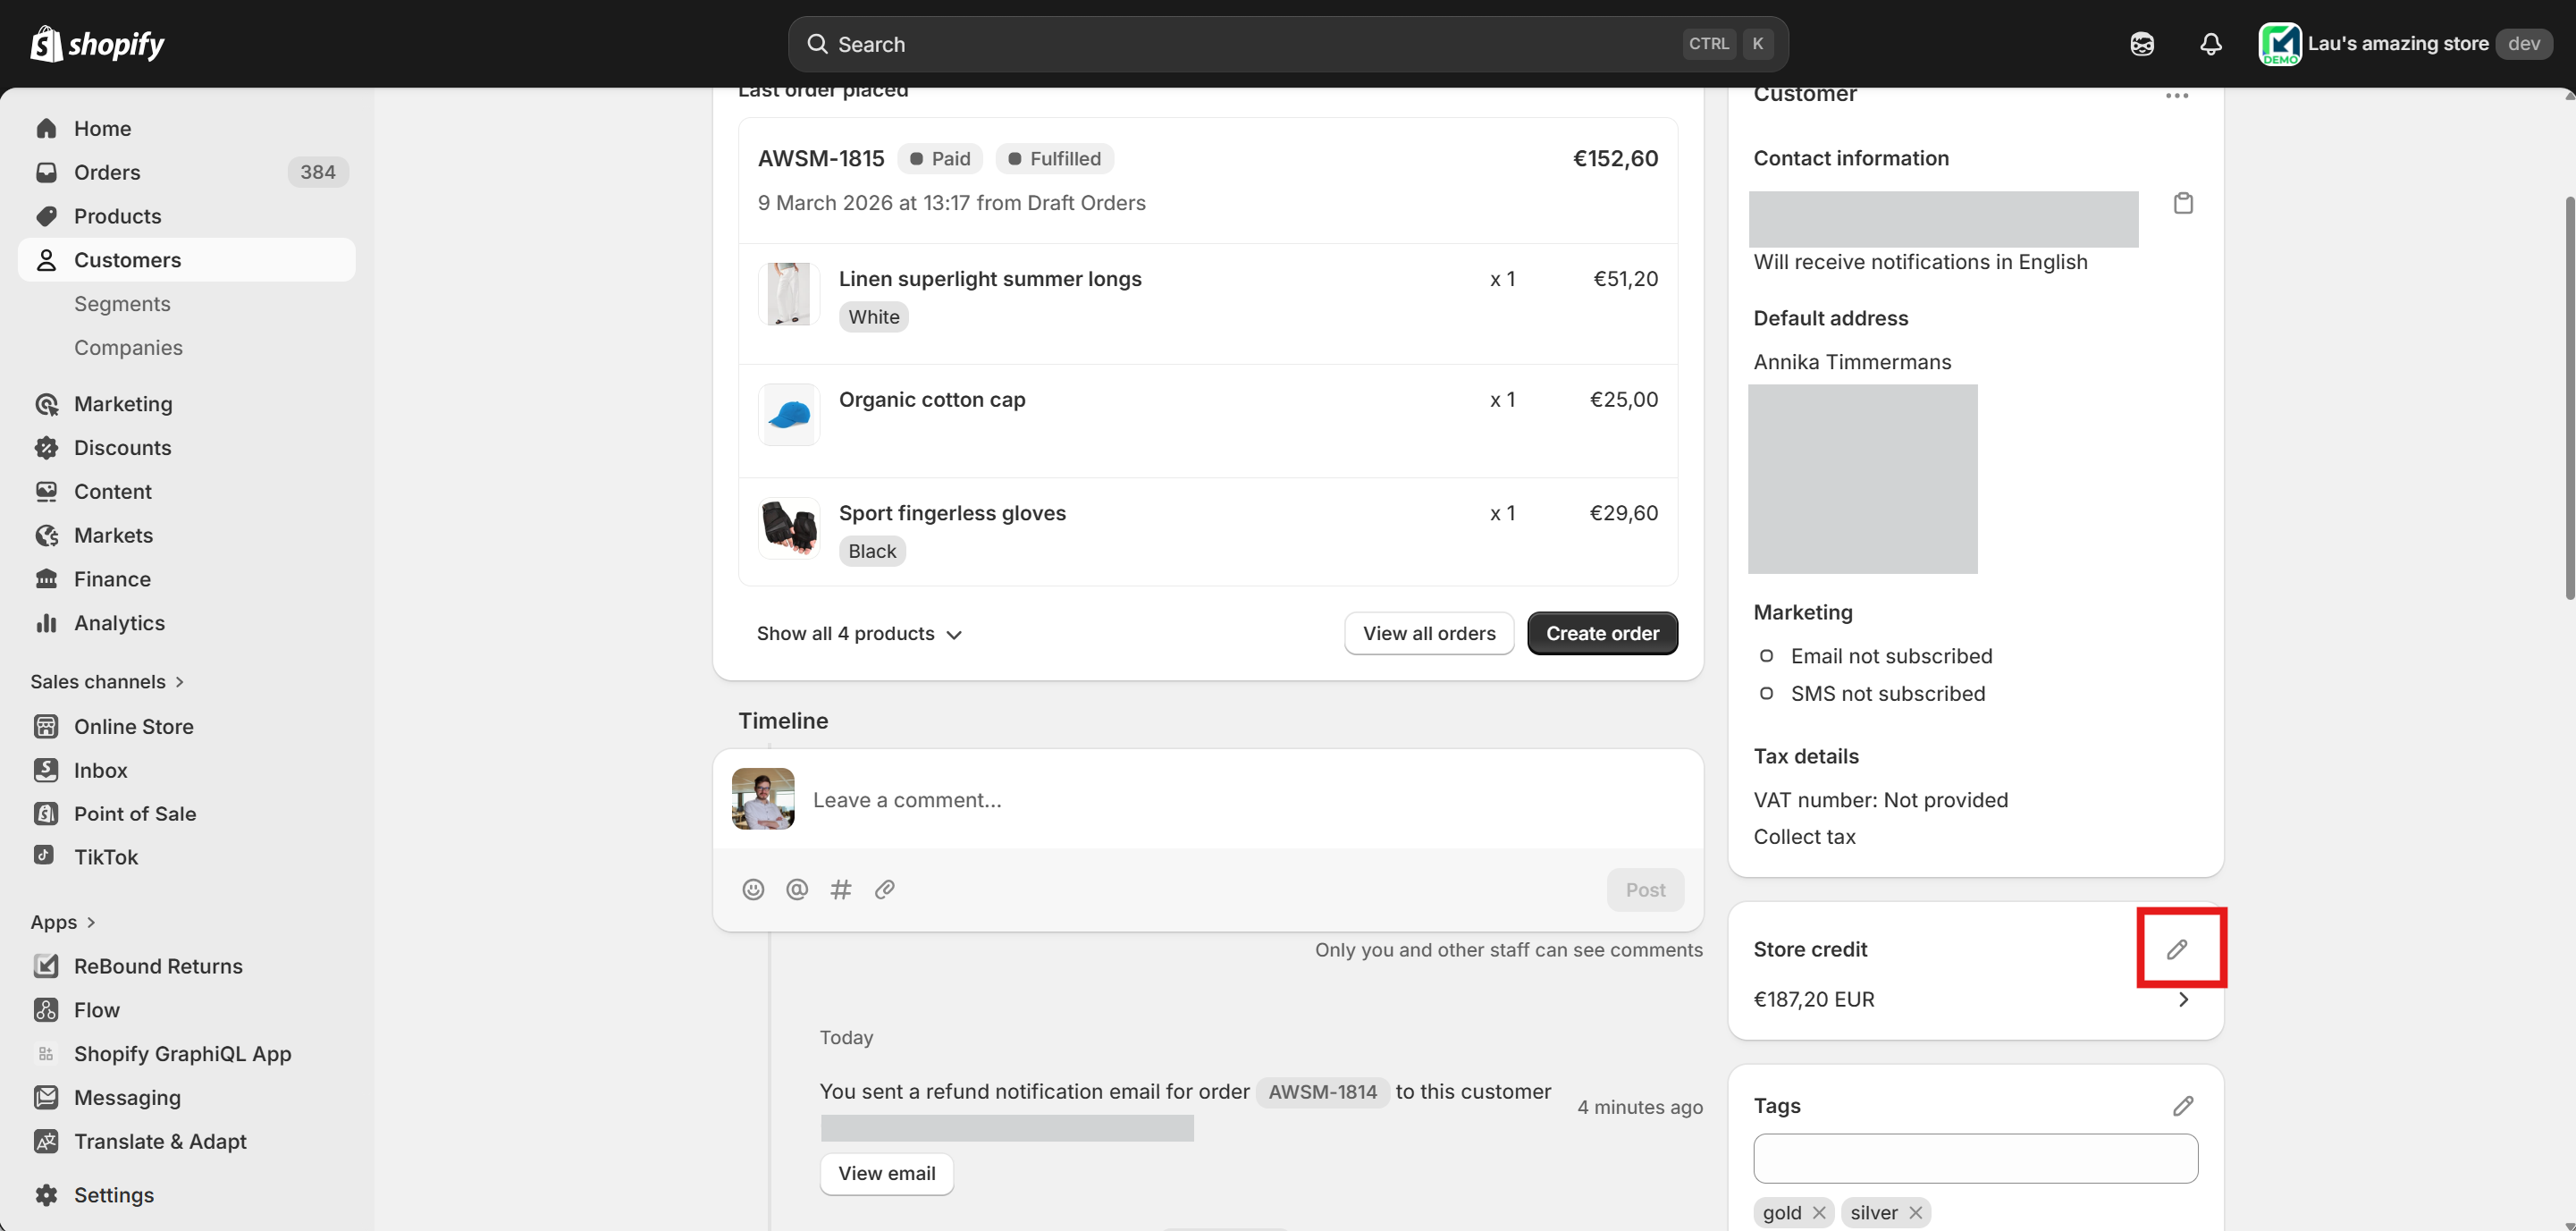
On the customer's profile page, scroll down to the "Store credit" card (on the right hand side) and press on the pen button ("edit balance") button.
-
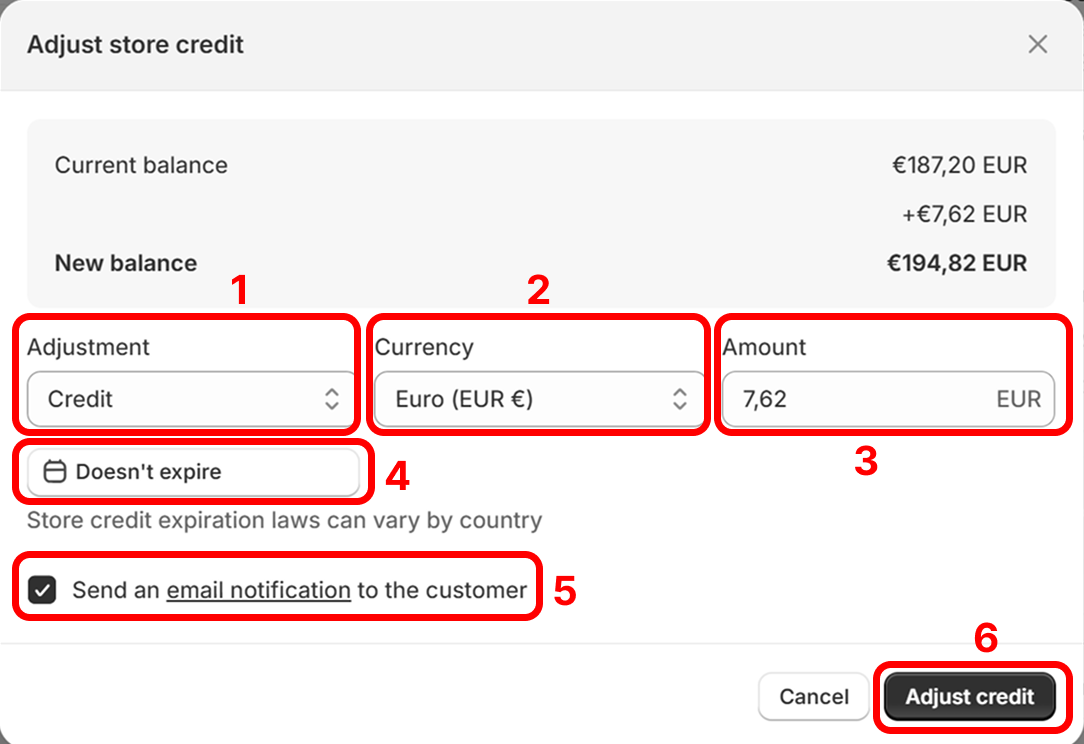
On the "Adjust store credit" screen that opens:
- 1 - Select "Credit" (this will add store credit into your customer's account).
- 2 - Select the currency (should be the same as the order/refund).
- 3 - Fill in the amount. This should be the bonus percentage your normally offer your customers. In this example, it's 10% of €76,20.
- 4 - Optionally, add an expiration date to the store credit.
- 5 - We recommend checking the "Send notification" box, so that your customer receives an automatic email notification when the bonus store credit is credited by Shopify.
- 6 - Press "Adjust credit" to submit.
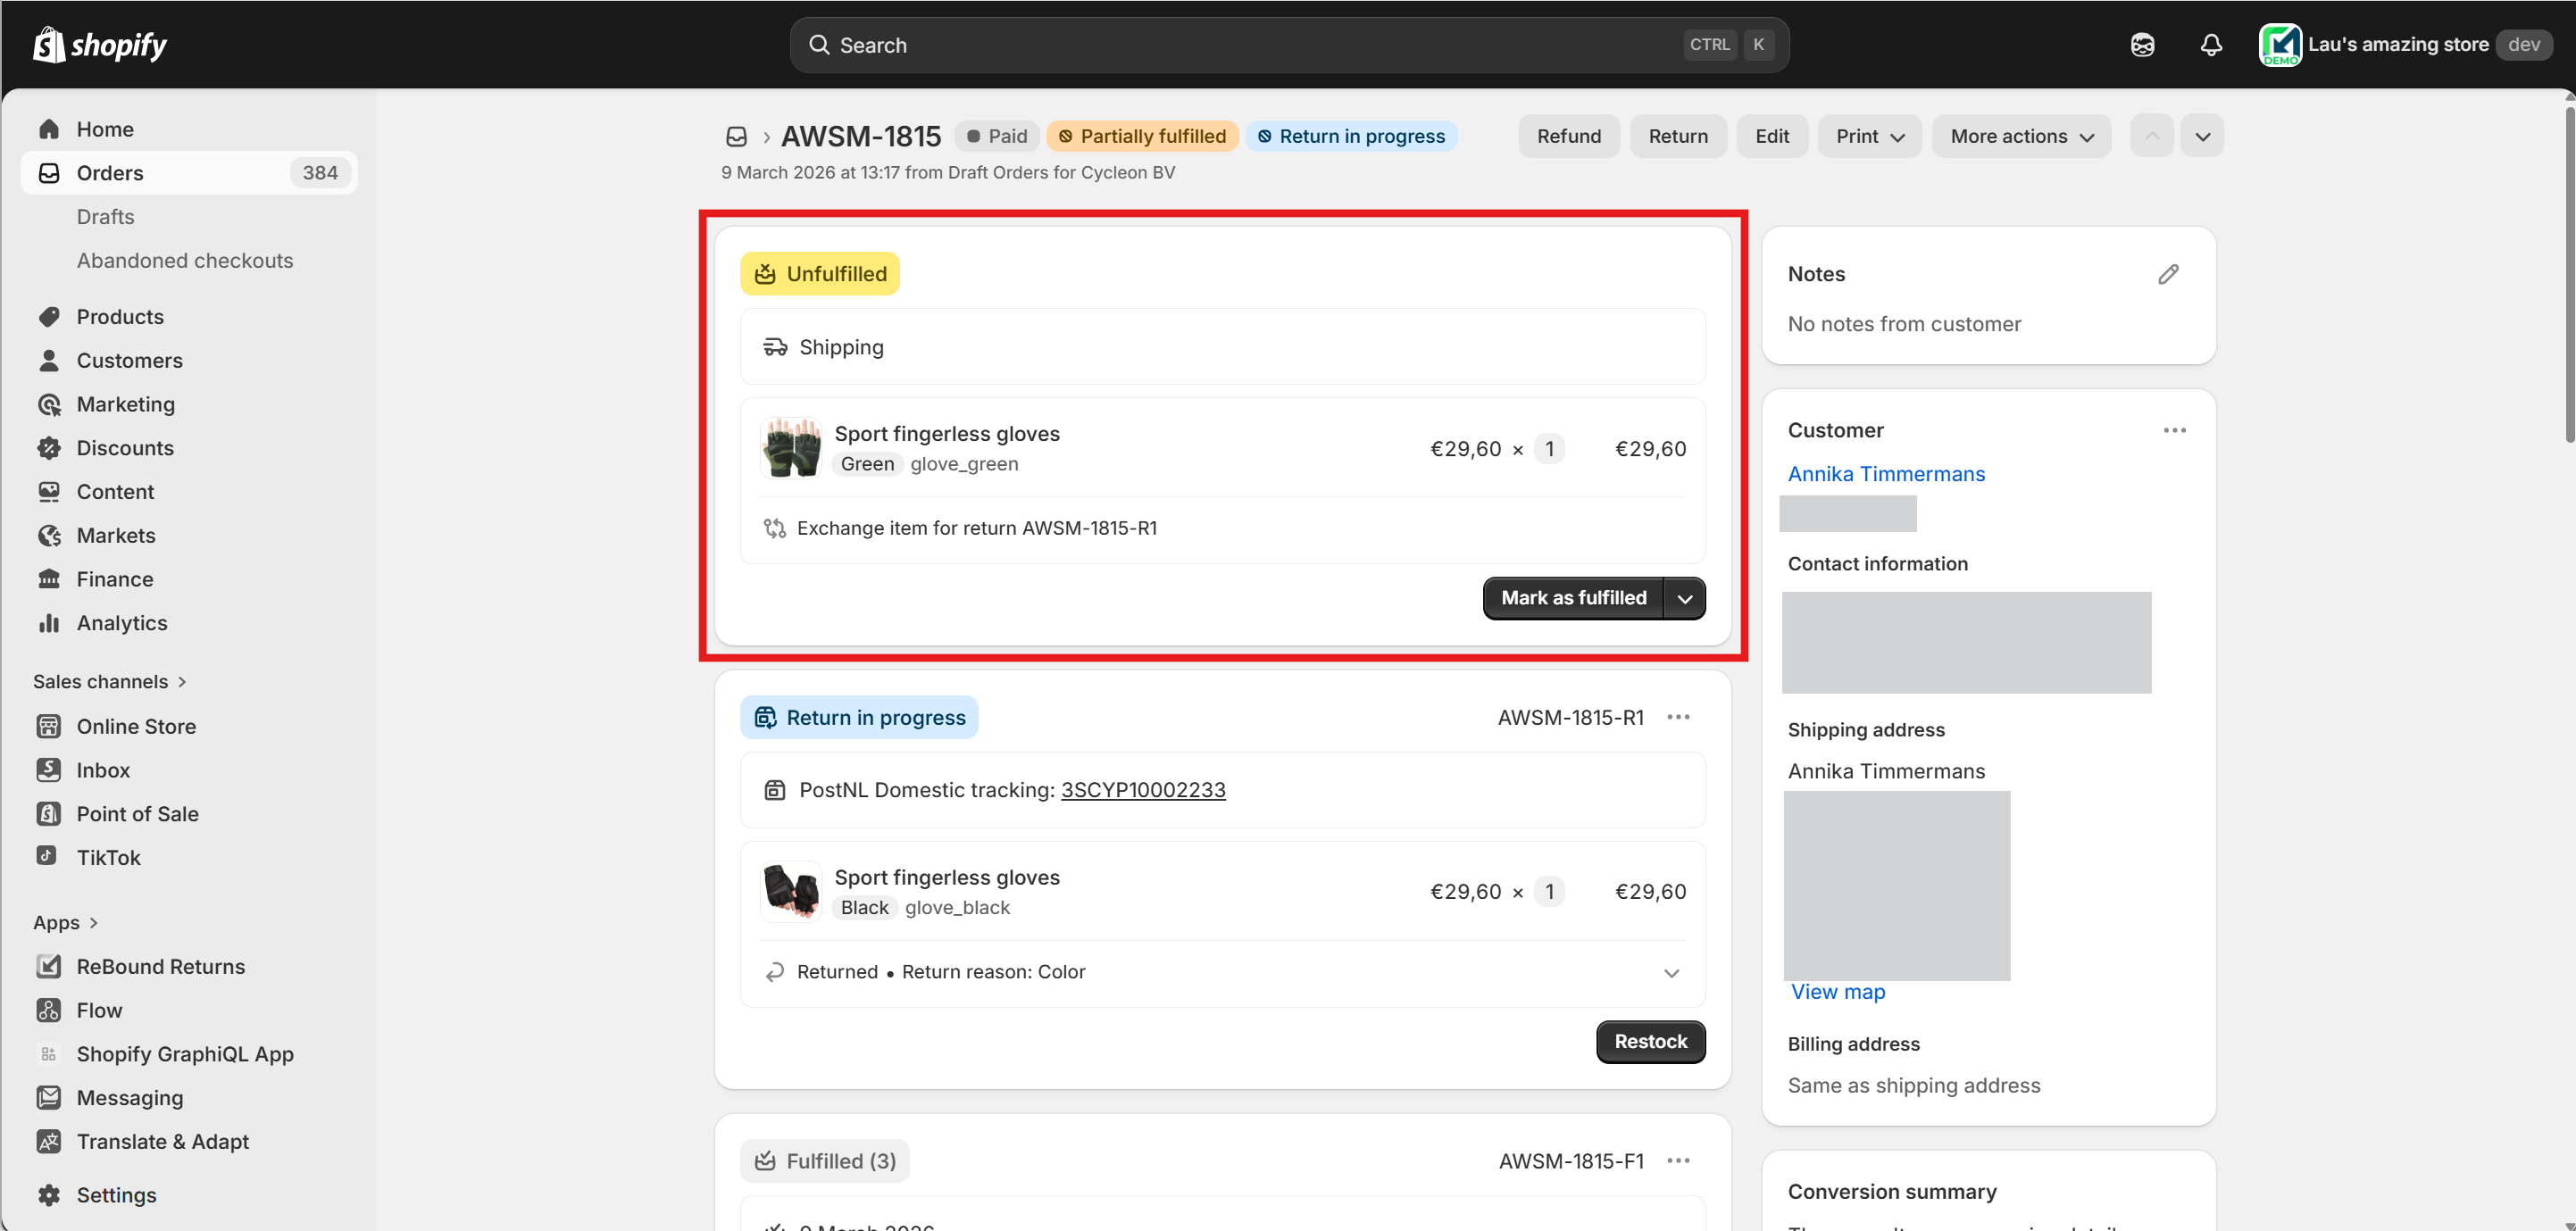
Processing an exchange release
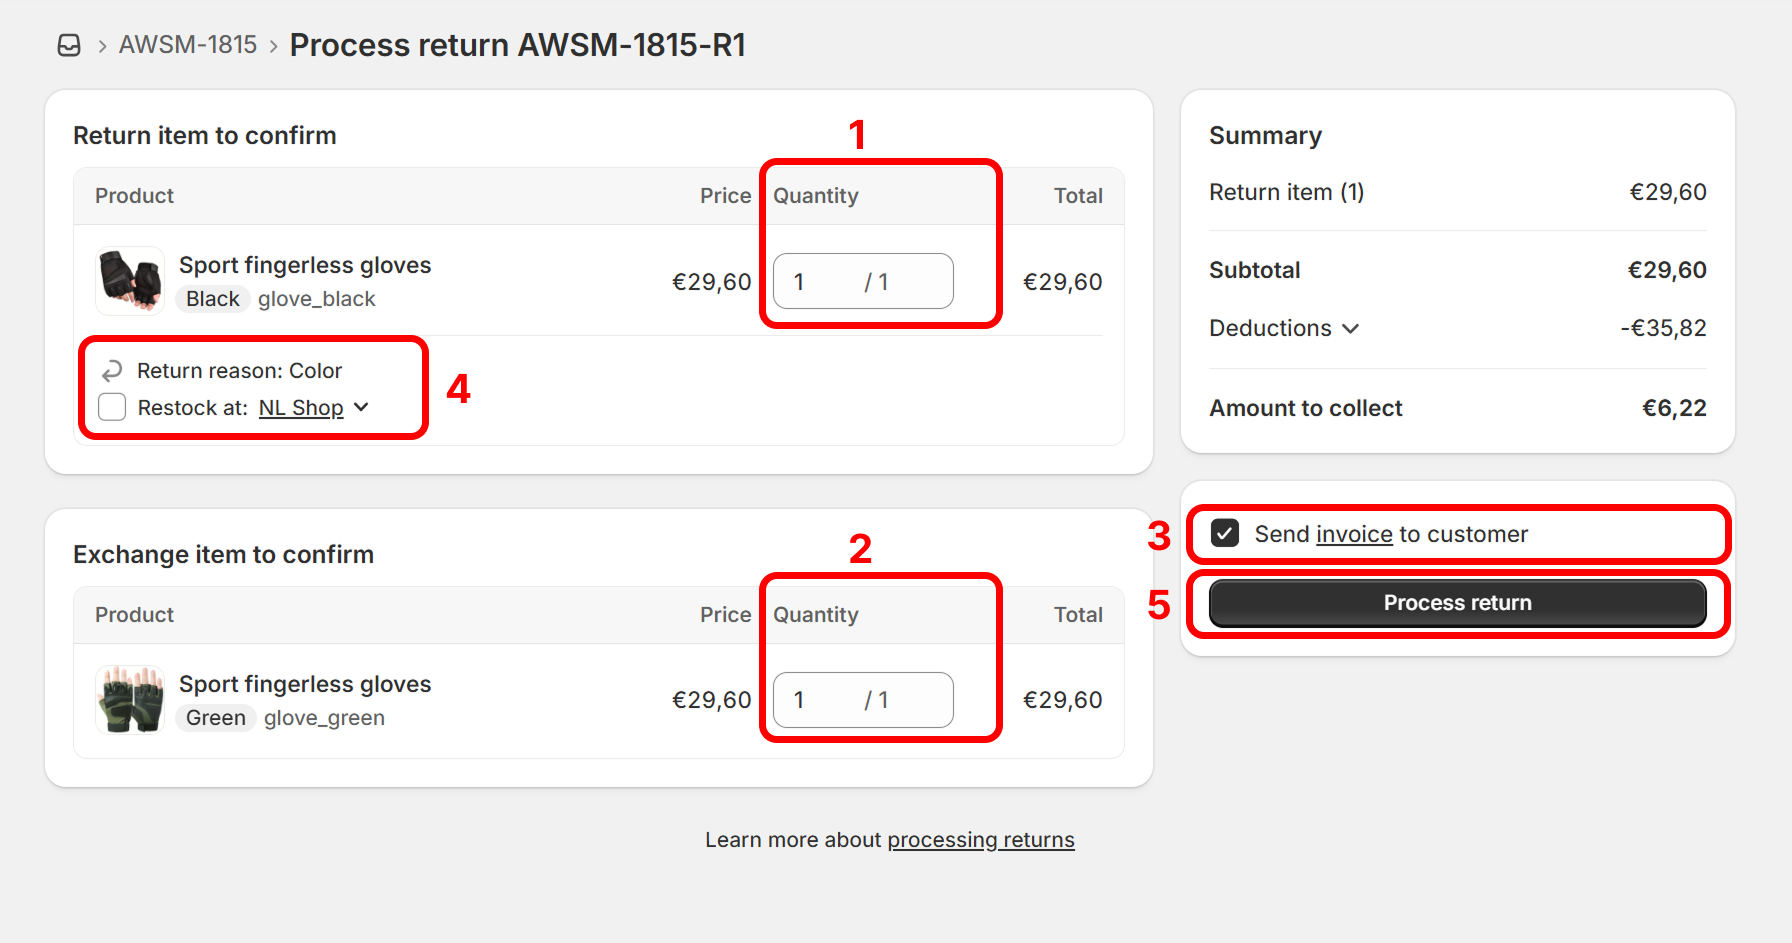
This applies to items with the "Exchange" outcome. To process them on the "Process return" page:
- Mark which return items you want to process. (We recommend processing the items in the notification email).
- Mark which exchange items items you want to release. These are the items the customer will be receiving in exchange for their return, instead of a refund. (We recommend selecting all exchange items that correspond to the processed return items.)
- We recommend checking the "Send invoice" box, so that your customer receives an automatic email notification when the exchange is released with an updated invoice for their order.
- Optionally, mark if you wish to restock the return items. (We recommend not restocking them, as the return milestone that triggered this email usually happens before the items reach your hub; therefore, they are likely not yet back in stock).
- Press on "Process return" to confirm.
This will create a new fulfillment order in your Shopify order. If the value of the exchange item is the same as that of the return item, the new fulfillment order will automatically be in "Unfulfilled" status. You or your fulfillment partner are now able to fulfill the exchange item.
Processing items with different outcomes
It is sometimes possible that the customer selected different outcomes for items in their return (e.g., two items to be refunded and a third to be exchanged).
Shopify allows you to process all items in one go from the "Process return" screen.
Frequently Asked Questions
Q: How often is manual processing required?
A: Manual processing is rare and typically only occurs in exceptional cases. Most refunds are automatically issued by our integration into your Shopify store.
Q: What if I have questions about a manual processing email?
A: You are able to process returns and issue refunds in Shopify yourself. If you need assistance, please refer to the Shopify documentation or reach out to their CS team.
If you have any questions about the data in a refund notification email or if you require any additional details to process the refund, please reach out to the ReBound Customer Success team.
Updated 5 months ago